If you want to reverse a clip you took on your iPhone, you’ve come to the right place. A reversed video can be stylish, astonishing, and entertaining for the viewer. For example, rain but water drops moving upwards. You can get a lot of views on your social media reels/videos by uploading reversed videos.
In this article, I will walk you through 4 easy ways to reverse a video on your iPhone.
Reverse A Video On iPhone – Short Guide
- First, open the iMovie app > create a new project by tapping on the plus sign icon > choosing “Movie” from the options.
- Then, select the video you want to reverse from your camera roll > Add it to the project.
- Once the video is added, tap on it to select it and swipe up on the video to reveal the editing options.
- From there, tap on the “Speed” option and choose “Reverse” from the speed options. The video will now play in reverse.
How To Reverse A Video On iPhone – 5 methods
- Reverse A Video on iPhone Using the VN video editor app.
- Reverse A Video on iPhone Using the Keenmaster app
- Reverse A Video on iPhone Using the Filme Lite – Video Editor app
- How to Reverse A Video on iPhone Using the Ezgif website
- How To Reverse A Video On iPhone Using Clideo’s Video reverse tool
Reverse A Video On iPhone Using The VN Video Editor App
Here is a step-by-step guide on how to reverse a video by using the VN video editor app:
1: Download the VN video editor app.

2: Open the app once it’s downloaded.
3: Tap on the “+” icon.
4: Tap on the new project button.

5: Select the video you want to reverse.

6: Tap the right arrow ( → ) button in the bottom right corner.
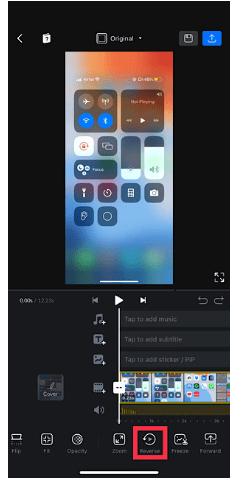
7: There are effects at the bottom of the screen. Swipe right until you find “reverse.”

8: Tap on the reverse button, and it will begin processing the video.
9: Tap the play button to preview the reversed video.
10: Tap the share icon in the top right corner.
11: Select the resolution and FPS you want to save the video in. (generally, the FPS is 60.)
12: Tap on the “export” button.

13: Add a title and description.

14: Tap on “save to album.”

15: Go to the “works” tab and tap on the three dots on the video.

16: Tap on share.

17: Tap on more.

18: Tap on save the video.
Your reversed video will be saved.
Reverse A Video On iPhone Using The Keenmaster App
Here is a step-by-step guide on how to reverse a video by using the Keenmaster app:
1: Download the Keenmaster app.
2: Open the Keenmaster app once it’s downloaded.
3: Tap on the “create new” button.

4: Select the aspect ratio your video is taken in. For portrait, it’s generally 9:16, and for landscape, it’s generally 16:9.

5: Tap the “create” button at the bottom.

6: Tap on “Media.”

7: Tap on “All.”
8: Select the video you want to reverse.


9: Tap on the timeline at the bottom left corner.

10: Select the “reverse” option. Keenmaster will start reversing the video.

11: Tap the tick button in the top right corner.
12: Tap on the play button to preview.
13: Tap the share button in the top right corner.

14: Select the resolution and save the video.

Your reversed video will be saved to your photo library.
Reverse A Video On iPhone Using The Filme Lite – Video Editor app
Here is a step-by-step guide on how to reverse a video by using the Filme Lite – Video Editor app:
1: Download the Filme Lite – Video Editor app.

2: Open the app after it’s downloaded.
3: Tap on the edit button; it’s the second button from the bottom left corner.


4: Select the video you want to reverse.

5: Tap on the “add to project” button.
6: Tap on the timeline.
7: Tap on the “reverse” option. It’s at the bottom centre of the screen.

8: Tap on the play button to preview.
9: Tap on the export button. Flim Lite will begin to export the video.

10: Tap on “done.”

Your reversed video will be saved.
How To Reverse A Video On iPhone Using The Ezgif website
Here is a step-by-step guide on how to reverse a video by using the Ezgif website:
1: Open the browser on your iPhone.
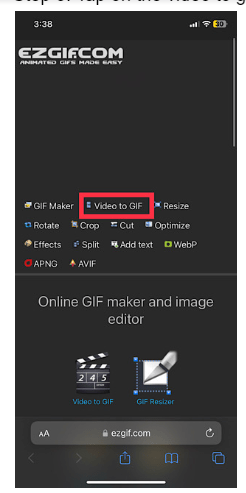
2: Go to ezgif.com or tap here.
3: Tap on the video to gif option.
4: Tap on reverse.

4: Tap on the “Choose file” option.
5: Tap on “Photo Library.”

6: Tap on the album with the video you want to be reversed.
7: Select the video you want to be reversed.

8: Tap “choose” in the bottom right corner.

9: Tap on upload video!

10: Select the sound options.

11: Select the “Reverse Video!” option.

12: Tap the play button under the “reverse video” title to preview.

13: Tap on the save button.

14: Tap on the download button.

15: Open the video once it’s downloaded.

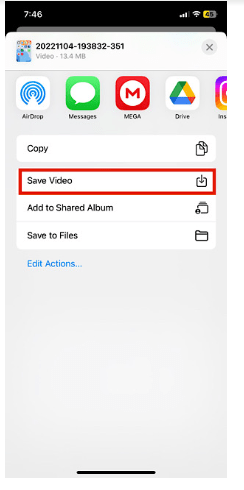
16: Tap on the share button in the bottom left corner.

17: Tap on “Save Video”

Your reversed video will be saved to your photo library.
How To Reverse A Video On iPhone Using Clideo’s Video reverse tool
Here is the simple step to reverse video using Clideo’s Video reverse tool
- Open Your Browser and open the clideo’s Video reverse tool &Upload the Video That you want to reverse

- Choose a file from your device (it supports MP4, AVI, MPG, VOB, WMV, MOV and more.)
- After that choose the reverse speed (available speed 0.5,1x,2x)

- Also you change the format of your video.

- Save your reverse video

Your reverse video will save in your gallery .
Related iPhone Topics
- How to Italicize on iPhone
- Improve your videos cropping :iPhone
- Why Are My FaceTime Photos Not Saving
Conclusion
We hope that this article has helped you with reversing your video. If you’re looking for the easiest and the fastest way to reverse your video, we suggest checking out the 3rd method in this article. You can reverse a video in just ten steps using the Filme Lite- Video Editor app.
FAQs
You can follow the above methods to reverse an existing video on your iPhone.
No, you cannot reverse a video in the photos app. Although, this article has the best apps that can help you reverse the video.
Follow any of the above methods to save the reversed video to your library, and then post the reversed video from your library to any social media.
Inverted video can either mean that it’s flipped/upside down and playing as if it was in a mirror, or it can mean that the colours of the video are opposite to what they were initially, creating a “negative” effect. It’s not the same as a reversed video.