
Taking a video of the screen of your iPhone is now easier than ever on an iPhone. You can easily record and save your favorite clips, strategies you learned for games on youtube, recipes you might want to save, things you want to share with your colleagues, and much more. You can also record your voice along with recording the screen. In this article, I will walk you through steps on how to screen record on iPhone and how to turn on the microphone while recording the screen.
Screen Record On iPhone – Quick Guide
- Open Setting > Tap on Control center > Select Screen Recording
- Open control center > Tap on Screen Recording > Wait for three seconds (Screen Recording will start)
- To stop Screen Recording > Open the control center > Tap on the Screen Recording icon ( Screen Recording will stop)
Basic Tips for improving your screen recording on iPhone
- All unused apps should be closed.
- Enable the Do Not Disturb feature.
- iMovie’s captioning feature
- Lock the orientation of your iOS device.
- Make use of an outside microphone.
How To Add Screen Record In iPhone Control Center? – Complete Guide
How to add a screen record button in the control center:
1: Go to the settings option on your iPhone.
2: Tap on Control Center.

3: The next step is to find the Screen Recording section, and you need to scroll down.
4: Select the green “+” icon on the left side of Screen Recording.
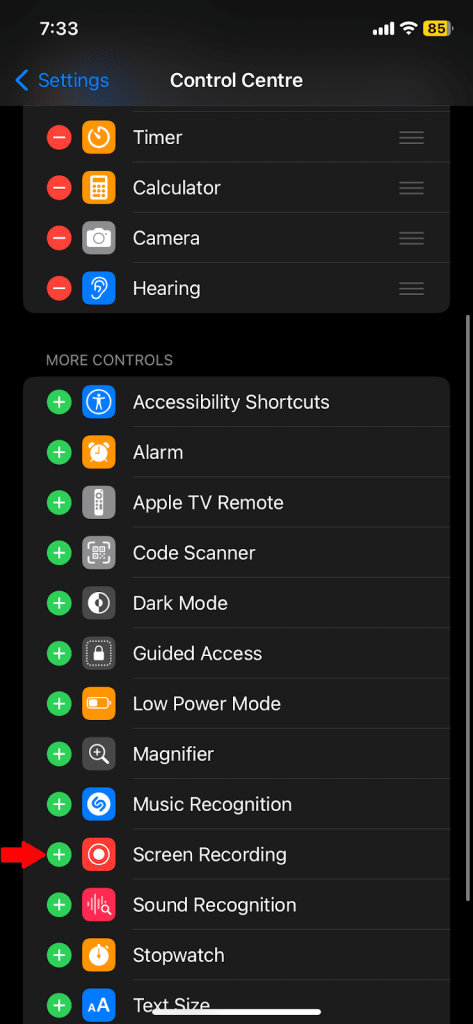
The Screen Recording option will be added to your control center.

How To Record Screen Record On iPhone?
1: Go to the page that you want to record.
2: Swipe from top to bottom on the top right side of your screen to open the control center, or swipe up from the bottom if you have an iPhone with a home button.
3: Tap the screen recording option, a solid circle inside a hollow circle.

Including the microphone: If you want to include the microphone, tap and hold the screen recording option, and you will see a button for the microphone on/off.


4: The screen recording button will start a 3-second countdown. Close the control center; when the countdown ends, it will give audio feedback and start recording.

5: Select the red button in the top left corner after finishing the screen recording.

6: Tap on “stop recording”

The iPhone will notify you that the screen recording is saved to photos.
How To Trim The Screen Recording?
Step-by-step guide on how to trim the screen recording:
1: Go to photos.
2: Scroll down and tap on “Screen Recordings” under “Media Types.”

3: Select the screen recording you want to trim.

4: Select the edit button in the top right corner.

5: There are sliders on either side of the timeline next to the play button. If you want to trim from the beginning, slide the arrow on the left side toward the right side. If you want to trim the video at the end, slide the arrow on the right side towards the left side.

6: If you want to see the results before saving, you can select the play button to preview.
7: Select the “done” button.

8: Tap on “Save Video.”

Your screen recording will be saved.
Related Reads:
- Multiple Wallpapers on iPhone 14
- How to Hide Videos on iPhone
- How To Bold Text On iPhone
- How to fix ghost touch on iPhone
Conclusion
Now you know the easiest way to record screens on your iPhone. Remember that the screen recording doesn’t work with OTT apps and streaming apps such as Netflix and Prime Video. It also doesn’t work with music streaming apps such as Apple Music and Amazon Music.
FAQs
The steps mentioned above are the same for any iPhone with iOS 11 and above. You can use them to record screens on iPhone 11.
Make sure that you have enough space to record the screen on your iPhone and make sure that you’re not recording from streaming apps/music apps.
Your screen recording icon might not be showing because you haven’t added it to the control center. Follow the “How to add a screen record button in the control center” section of this article.
You can find screen recordings in the photos app, the most recent screen recording will be first in the recent album, rest of the iPhone screen recordings will be in the “screen recordings” album under “media types.”